
Sending Messages to Multiple Recipients
You can send messages to multiple contacts at a time.
- By Importing Contacts from an Excel File
- From the Contacts Page
By Importing Contacts from an Excel File
You can send a message to multiple contacts by importing them from an Excel file.
1. Create an Excel file with the mobile number or email address of the recipients to want to send a message to.
Important
Phone numbers must be in the international format without breaks, hyphens, or spaces. For example:
[country_code][area_code][local_number]
2. Save the file to your local system.
3. Log in to the admin portal as an administrator.
4. Click Compose Message > Send to Multiple Recipients > Add Recipients From File.
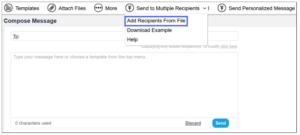
5. Select the Excel file with the recipients mobile number or email addresses, and click Open.
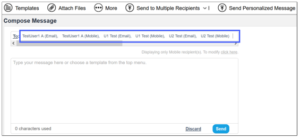
6. Select the destination to which you want to send the message: Mobile, Voice, Fax, or Email.
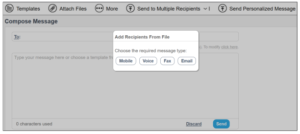
The file with recipients is attached to the To field.
7. In the message text area, type the message. The number of characters in the message is displayed at thebottom of the text box.
8. (Optional) Click Attach Files to add one or more attachments. You can select one file at a time. The attached file is displayed in the text box, from where you can also delete the file.
9. Click Send to send the message to the selected recipients.
The message status is displayed in the Sent Items folder.
From the Contacts Page
You can also send messages to multiple recipients from the Contacts page.
- Log in to the admin portal as an administrator.
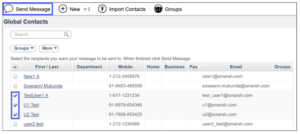
- Click My Contacts or Global Contacts.
- Select the checkbox against the users to whom you want to send a message.
- Click Send Message.
5. Select the destination to which you want to send the message: Mobile, Mobile(Voice), or Email.
6. Click Next.
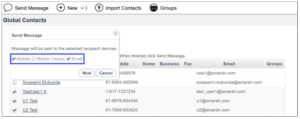
The selected destination(s) of the selected users are added to the To field.
7. In the message text area, type the message. The number of characters in the message is displayed at the bottom of the text box.
8. (Optional) Click Attach Files to add one or more attachments. You can select one file at a time. The attached file is displayed in the text box, from where you can also delete the file.
9. Click Send to send the message to the selected recipients(s).
The message status is displayed in the Sent Items folder.