
Overview:
To enable US Android native call recordings on your Android Samsung device you may be required to flash (installing a new software, mostly operating system) your phone’s ROM with a version identified with a non-US country code. After you perform this modification, you will be able to record voice calls (as well as SMS/MMS) using the TeleMessage Android Archiver. Adjust your Country Specific Code (CSC) as per the following procedure.
Watch this video, or follow the instructions below the video.
Preliminary notes
- You must have sufficient technical understanding to make a system flash hack to change your phone’s CSC.
- All the information on your phone will be deleted and wiped as part of this process, so make sure you have everything backed up.
- You are doing these actions on your own discretion, and TeleMessage takes no responsibilities over any deletion, malfunction or loss of information, loss of data or your inability to get the phone back to its original working state.
- Act in accordance with your local laws and regulations. For example, in some states in the US, you need two-party consent to record the calls.
- This CSC region code change was tested on Samsung Galaxy Exynos S21, S21+, S21 Ultra, S20, S20+, S20 Ultra, S10e, S10, S10+.
Tools needed to enable this CSC change:
- Samsung phone with Android 11 and One Ui 3.0 or later
- PC computer
- USB cable connecting your Samsung phone and the computer
- Odin firmware update
- Samfw firmware download to your PC (explained later)
To modify your Samsung Android CSC:
Step #1
Download and extract Odin Software into your PC by clicking here.
Step #2
Open your phone and go to Settings > About Phone > Model information to view your device module.
Record the full model number of the device listed, to ensure downloading of the correct firmware for your device.
Step #3
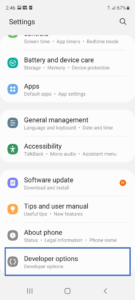
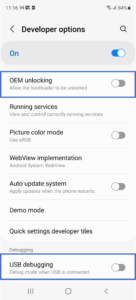
Enable the “OEM Unlock” and the “USB Debugging” options under your device settings in “Developer options”.
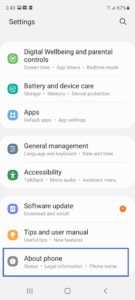
Go to device Settings.
Scroll down and tap on About phone.
 →
→
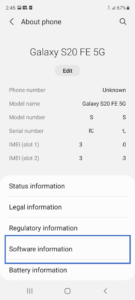
Tap Software information.
 →
→
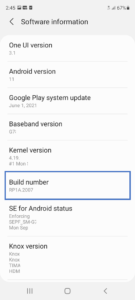
Tap Build number once
Tap Build number a second time
…
Tap Build number a total of seven times.
 →
→
You will see an indication of the taping counter.
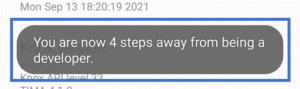
When you see the indication for Developer mode
stop and go back to Settings screen.
 →
→
Scroll down and tap on the newly created menu
entry – Developer options.
 →
→
Toggle ON the USB debugging and OME unlocking.
 →
→
Step #4
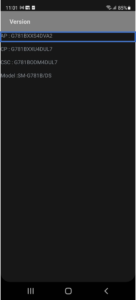
retrieve your AP information.
Open your mobile device Phone dialer app and type:
*#1234#.
 →
→
A screen with your device CSC information. Write down
the information under in the AP section.
Step #5
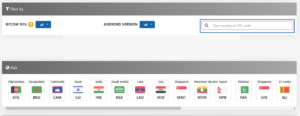
Click here to search for a new frame were to enable native call recording.
Enter your device module (step #2) in the search bar.
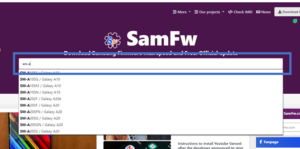
Select only one the following country’s:
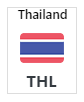
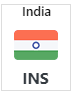

You can use the search bar to find one by typing the acronyms: THL, INS, BKD.
Click on the version matching your AP number (step #4).
you can use Ctrl + F to search for the correct section.
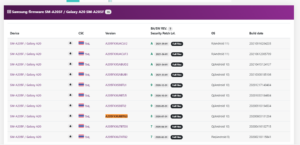
Click Download SamFw Server.
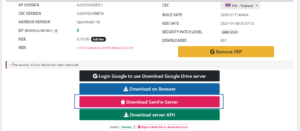
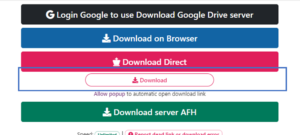
A popup window will appear, close it and click Download.
Step #6
Once the CSC file has been downloaded into your PC, please extract the downloaded files to start the CSC process (note, Odin software will be needed to be extracted as well). They should look as below (Depending on your OS):

Step #7
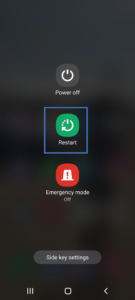
Open Odin software on your PC then restart the mobile device.
Note, to restart ether hold the volume up and
down buttons on your device for about 5
seconds or the power and volume down buttons
for about 5
And then tap Restart.
 →
→
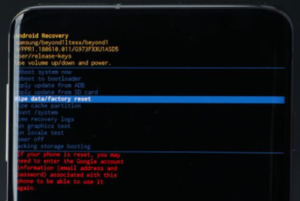
Connect your mobile via a USB cable into your PC
before it boots back up and.
Once your device is in his boot menu he will display as
followed I the example below:
Step #8
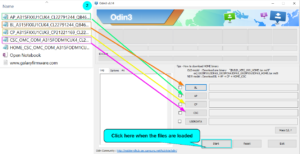
on your PC open the Odin program and drag and drop the files from the CSC folder as explained below and click Start.
Step #9
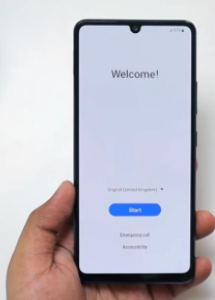
Once this process is complete, your device will reboot itself automatically.
Your mobile device has new firmware. It is starting as if it’s a new blank device.
Follow the basic setup for an Android device – selecting language, setting up WIFI, and logging into a Gmail account.
Step #10
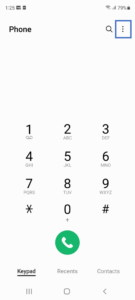
Once your device completed the set-up you will need to ensure the new CSC and Firmware are working proprely.
Open the phone native dialler app and tap the 3 dots
on the top right of the screen.
 →
→
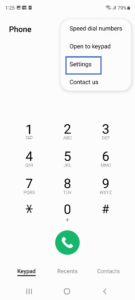
Tap Settings.
 →
→
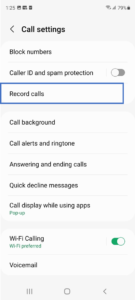
You should see a tab for Record Calls tap it.
 →
→
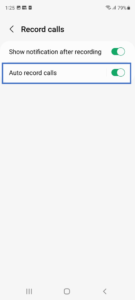
Toggle Auto record calls ON.
You are ready to install and activate the TeleMessage Android Archiver with call recordings from Google Play Store.
For the full installation guide click here.